

To install Pritunl (an open-source VPN server) on Amazon Linux 2023, follow the steps below. Pritunl provides an easy-to-use and secure platform for managing VPN servers. Here’s a step-by-step guide:
Let's start fresh and go step by step to install Pritunl on Amazon Linux 2023 and configure it.
This guide will cover everything from setting up the EC2 instance to configuring your security settings for Pritunl to work correctly.
This guide will cover everything from setting up the EC2 instance to configuring your security settings for Pritunl to work correctly.
Step 1: Set up an EC2 instance on AWS
(1) Log in to AWS Management Console:
(2) Launch a new EC2 instance:
- Go to the AWS Management Console.
(2) Launch a new EC2 instance:
- From the EC2 Dashboard, click on Launch Instance.
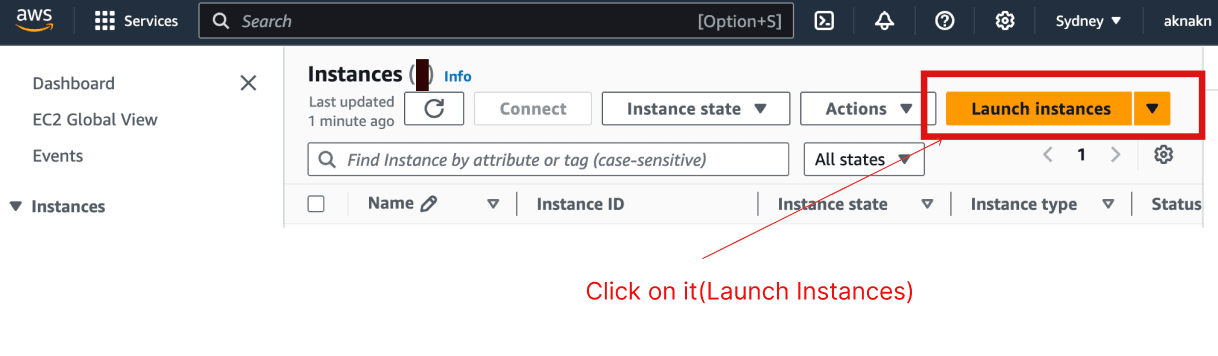
(3) Launch an instance (Setup the Instance)
- Choose the Amazon Linux 2023 AMI (Amazon Machine Image).
- Choose an instance type (e.g., t2.micro if you're eligible for the free tier).
- Configure instance details as needed.
- For Storage, the default 8GB should suffice unless you need more.


- Allow SSH (port 22) for remote access (optional, but recommended).
- Allow HTTP (port 80) and HTTPS (port 443) for Pritunl's web interface.
- Allow UDP 1194 for OpenVPN (used by Pritunl).
the following pic is for the our security group.

Step 2: Connect to your EC2 instance via SSH
- Get the Public IP of your EC2 instance from the EC2 Dashboard.
- SSH into your EC2 instance:
- On your local machine, open a terminal and run the following command, replacing your-key.pem with your private key and ec2-user@your-ec2-ip with your instance's IP address:
ssh -i ~/path/yourkey.pem ec2-user@your-ec2-ip Step 3: Update your EC2 instance
Once connected, update your instance to ensure you have the latest packages:
sudo yum update -y(2) Install MongoDB (Pritunl requires MongoDB for its backend):
sudo tee /etc/yum.repos.d/mongodb-org-6.0.repo<<EOF
[mongodb-org-6.0]
name=MongoDB Repository
baseurl=https://repo.mongodb.org/yum/amazon/2023/mongodb-org/6.0/x86_64/
gpgcheck=1
enabled=1
gpgkey=https://www.mongodb.org/static/pgp/server-6.0.asc
EOF
Then install MongoDB:
sudo yum install -y mongodb-org Step 5: Install Pritunl
Add Pritunl's repository:
sudo tee /etc/yum.repos.d/pritunl.repo << EOF
[pritunl]
name=Pritunl Repository
baseurl=https://repo.pritunl.com/unstable/yum/amazonlinux/2023/
gpgcheck=1
enabled=1
gpgkey=https://raw.githubusercontent.com/pritunl/pgp/master/pritunl_repo_pub.asc
EOF
Install Pritunl:
sudo dnf -y install pritunl wireguard-tools
sudo systemctl enable pritunl
sudo systemctl start pritunl
Step 6: Start and enable MongoDB
Pritunl needs MongoDB running, so start and enable the MongoDB service:
sudo systemctl start mongod
sudo systemctl enable mongod
OR all in one
sudo tee /etc/yum.repos.d/pritunl.repo << EOF
[pritunl]
name=Pritunl Repository
baseurl=https://repo.pritunl.com/unstable/yum/amazonlinux/2023/
gpgcheck=1
enabled=1
gpgkey=https://raw.githubusercontent.com/pritunl/pgp/master/pritunl_repo_pub.asc
EOF

sudo tee /etc/yum.repos.d/mongodb-org-7.0.repo << EOF
[mongodb-org-7.0]
name=MongoDB Repository
baseurl=https://repo.mongodb.org/yum/amazon/2023/mongodb-org/7.0/x86_64/
gpgcheck=1
enabled=1
gpgkey=https://www.mongodb.org/static/pgp/server-7.0.asc
EOF

sudo dnf -y install pritunl mongodb-org wireguard-tools
sudo systemctl enable mongod pritunl
sudo systemctl start mongod pritunl
Step 7: Access Pritunl Web Interface
(1) Find your EC2 instance's public IP (if you haven't already).
(2) Open a web browser and go to the following URL (replace your-ec2-ip with your actual EC2 instance IP):
https://your-ec2-ip
(2) Open a web browser and go to the following URL (replace your-ec2-ip with your actual EC2 instance IP):
https://your-ec2-ip

(3) You will get a SSL certificate warning because it’s a self-signed certificate (it’s fine for testing, just proceed).
(4)Pritunl will ask for a setup key on the first login. To get the setup key, run the following on your EC2 instance:
(4)Pritunl will ask for a setup key on the first login. To get the setup key, run the following on your EC2 instance:
sudo pritunl setup-keyThis will output a setup key. Copy it.
Enter the setup key in the web interface to complete the initial setup.
Enter the setup key in the web interface to complete the initial setup.
pritunl default-password
go back to terminal of instance and execute the following command.
sudo pritunl default-passwordit will generate as
Administrator default password:
username: "pritunl"
password: "0f9jJfh1hif4"
Administrator default password:
username: "pritunl"
password: "0f9jJfh1hif4"
put the user name and password that we generated above

Step 8: Configure your VPN Server
Once you log into Pritunl’s web interface, you can configure your VPN server.
Create a new organization:
Navigate to the Organizations tab and create a new organization.
Create a new user:
Under the organization, create a new user.
Create a new VPN server:
Go to the Servers tab and create a new server.
Set it to use the UDP 1194 port (default OpenVPN port).
Download the VPN profile:
After creating the server, download the VPN profile for your user.
Use this profile with an OpenVPN client to connect to your VPN.
this is the title
before description
ssh -i key admin@svrip after description


